Latest Entries »

Filtering data sets

Sometimes when running DBUnit based tests, not all the data in a table is needed. Only several rows are needed for comparisons in most cases but the entire table should not be cleared because of it.

Fortunately under DBUnit, data sets can be filtered and then compared. Here is an example of setting up a filter with comments:

            // Load the actual database table data into a data set
            IDataSet databaseDataSet = getConnection().createDataSet();
            ITable actualTable = databaseDataSet.getTable(TABLE_ADDRESS);

            // Load expected data from an XML dataset
            ReplacementDataSet expectedDataSet = new ReplacementDataSet(
                    new FlatXmlDataSetBuilder().build(new File("src/test/resources/addressExpected.xml")));
            //replace [NULL] strings with null
            expectedDataSet.addReplacementObject("[NULL]", null);
            expectedTable = expectedDataSet.getTable(TABLE_ADDRESS);
            
            //filter out the columns from the actual dataset by reading the expected
            //XML file and then using the specified columns to create the dataset.
            //For this to work, the expected XML dataset MUST be a subset of the
            //actual dataset and MUST NOT contain columns not present in the actual
            //dataset.
            //so this code means that filter the actual table with columns from the
            //expected table, so if expected table has 3 columns, then in the actual
            //table, use only those 3 columns
            ITable filteredColumnsTable = DefaultColumnFilter.includedColumnsTable(
                                actualTable, expectedTable.getTableMetaData().getColumns());
            
            //select a column to scan row data with, if row data matches a value, then use the row
            IRowFilter rowFilter = new IRowFilter() {

                @Override
                public boolean accept(IRowValueProvider rowValueProvider) {
                    Object columnValue = null;
                    try {
                        columnValue = rowValueProvider.getColumnValue("address_line1");
                    } catch (DataSetException ex) {
                        Logger.getLogger(AddressDaoBeanTest.class.getName()).log(Level.SEVERE, null, ex);
                    }
                    if (((String) columnValue).equalsIgnoreCase("Line1")) {
                        return true;
                    }
                    return false;
                }
            };
            filteredRowsTable = new RowFilterTable(filteredColumnsTable, rowFilter);

The example is straightforward and filters data from the actual data set obtained from the database and can be used for comparison.

Comparing data set results

To compare results of a unit test run with a data set, use the normal JUnit assert based methods as follows:

        // Assert actual database table match expected table
        Assertion.assertEquals(expectedTable, filteredRowsTable, new Column[]{new Column("address_line3", DataType.VARCHAR)});

This compares results from the actual database data set against the filtered data set using the specified column as a comparator.

Before any DBUnit tests can be run, there must be some expected data, some manipulation and then comparison with some expected results. This posting will look at the setup of the initial data and loading the expected data sets. The next post will look at filtering and comparing results with expected results.

Setup of initial data

To setup the initial data set, the method getDataSet needs to be overridden. Here is an example implementation:

    @Override
    protected IDataSet getDataSet() throws Exception {
        loadedDataSet = new FlatXmlDataSet(new FlatXmlProducer(new InputSource(
        this.getClass().getClassLoader().getResourceAsStream("/src/test/resources/address.xml"))));
        return loadedDataSet;
    }

This loads an XML file containing data to be used as the initial data set. This can mimic an existing database table state, so if the actual database has 3 rows, this XML could have the same 3 rows. The data set returned can then be used in the tests for comparisons.

The easiest way to manipulate the data sets is via XML files.

Setup of expected data

For the unit tests to be effective, it is useful to have some expected data set to compare the results of a test run. DBUnit allows you to setup the expected data set for comparison of results.

The expected data set is setup in the same way as the initial data set described above. Here is some code that shows the expected data set being loaded from an XML file:

            // Load expected data from an XML dataset
            ReplacementDataSet expectedDataSet = new ReplacementDataSet(
                    new FlatXmlDataSetBuilder().build(new File("src/test/resources/addressExpected.xml")));
            expectedDataSet.addReplacementObject("[NULL]", null);
            expectedTable = expectedDataSet.getTable("address");

DBUnit is a very good tool for use in testing Hibernate applications in the data access layer. DBUnit based tests work by comparing the state of the database from particular method calls and comparing with an expected data set. If the data sets match with the database data state, then the test is said to be successful.

Fortunately, using DBunit is straightforward and powerful tests and comparisons can be done.

Setting up DBUnit to use in unit tests

In Maven POM, add the DBUnit dependency as follows:

        <dependency>
            <groupId>org.dbunit</groupId>
            <artifactId>dbunit</artifactId>
            <version>2.4.7</version>
            <scope>test</scope>
        </dependency>

For ANT or if using manually, then add the JAR to the test classpath. DBUnit is now ready to be used in tests.

When writing tests, the unit test class must now extend the abstract class org.dbunit.DatabaseTestCase and implement the two key methods which are:

1) getConnection – retrieves the database connection to perform the unit tests via DBUnit

2) getDataSet – retrieves a dataset to be manipulated either from a table or flat file that can be in XML format.


            <version>2.4.7</version>

To cleanly implement DAOs in the data access layer where the Hibernate persistence takes place, it is a good idea to have interfaces to abstract entry into this layer so that new implementations can be swapped in and out without affecting any of the other layers in a layered application architecture.

Google has some packages that take the abstraction further where a DAO can be used against a single specified domain object (such as a Hibernate entity class). The interface to extend so that all these features are available is com.googlecode.genericdao.dao.hibernate.GenericDAO and this interface should be extended in the DAO interface package.

An example code snippet:

public interface AddressDao extends GenericDAO<Address, Long> {
  //method signatures declared here...
}

As this DAO interface extends the GenericDAO<X, Y> interface, when implementing the DAO interface, the save(), find(), etc methods will pass in parameters that are of the type X value in the generic, so they become save(X), find(X), etc. These method declarations in the interface can be overridden too to provide specific functionality.

It is a good idea to have a BaseDao class that all subclasses will extend from. The base class can contain a validator that checks objects of any type before they are persisted to the database. The BaseDao class should extend GenericDAOImpl class as this class extends HibernateBaseDAO so all session handling can be done.

Here is a BaseDao class:

/*
 * To change this template, choose Tools | Templates
 * and open the template in the editor.
 */

package com.riz.phonebookapp.domain.dao;

import com.googlecode.genericdao.dao.hibernate.GenericDAOImpl;
import java.io.Serializable;
import javax.validation.Validator;
import org.hibernate.SessionFactory;
import org.springframework.beans.factory.annotation.Autowired;
import org.springframework.transaction.annotation.Transactional;

/**
 *
 * @author Riz
 */
@Transactional
public class BaseDao<T, V extends Serializable> extends GenericDAOImpl<T, V> {

   @Autowired
   private Validator validator;

   /** {@inheritDoc} */
   @Autowired
   @Override
   public void setSessionFactory(final SessionFactory sessionFactory) {
      super.setSessionFactory(sessionFactory);
   }

   /** {@inheritDoc} */
   @Override
   public boolean save(final T entity) {
      validator.validate(entity);
      return super.save(entity);
   }
}

As you can see, the overridden method will validate the entity before persistence. Any errors will be flagged and no persistence takes place. The validator and session factory are injected in as needed.

To make use of the BaseDao and the interface mentioned above, these need to be used in a DAO bean class that contains concrete methods to do something useful such as providing services like checking if an email exists or saving a phone number but also using the added functionality that the BaseDao and the interface brings along with it.

Here is a concrete DaoBean class example:

package com.riz.phonebookapp.domain.dao;

import com.riz.phonebookapp.domain.Address;
import java.util.HashSet;
import java.util.Set;
import org.hibernate.Query;
import org.slf4j.Logger;
import org.slf4j.LoggerFactory;
import org.springframework.stereotype.Repository;
import org.springframework.transaction.annotation.Propagation;
import org.springframework.transaction.annotation.Transactional;

/**
 *
 * @author Riz
 */
@Transactional(propagation=Propagation.REQUIRED)
@Repository("addressDao")
public class AddressDaoBean extends BaseDao<Address, Long> implements AddressDao {

    /** The Constant LOG. */
   public static final Logger LOG = LoggerFactory.getLogger(AddressDaoBean.class);
   //concrete service methods here
}

As you can see, both the BaseDao and the interface are implemented to allow other implementations to be used too. All of the goodness that the BaseDao and the inteface brings can also be used. In this case, methods such as find(Address a), save(Address a), remove(Address a), etc can also be used in addition to the user service defined methods.

When implementing entities in Hibernate, sometimes some validation needs to be done on the data that the entities will hold. For example, a postal code needs to be a certain length and format, a phone number cannot contain letters and need to be a certain length. In Hibernate/JPA this is possible through the use of several validation annotations and their properties. Some of the common ones are as follows:

@Size(max=10, message="{email.type.size}")

This annotation limits the size of the data being set in the entity. If it is outside of the size constraints then an appropriate message is displayed during validation failure.

@NotNull(message="{email.address.notEmpty}")

This annotation ensures that the data being set in the entity is not null. If it is null, then an appropriate message is displayed during validation failure.

Notice that the messages are reading some property from a properties file. It has been set this way for internationalisation and so that the messages can be changed without redeployment of the application. To use a properties file, create a properties under src/main/resources directory so that it is read in from the classpath. The properties file needs to have key value pairs, the key must match the message name value in the annotation.

A project that incorporates Hibernate is pretty straightforward to setup as long as the Spring Framework is used in conjunction with it. This example assumes Spring and Maven will be used. To setup Hibernate, follow these steps:

1) Add the Hibernate dependencies into Maven POM:

First add the properties:

<properties>
    <hibernate.core.version>3.3.2.GA</hibernate.core.version>
    <hibernate.annotations.version>3.4.0.GA</hibernate.annotations.version>
    <hibernate.validator.version>4.0.2.GA</hibernate.validator.version>
</properties>

Then add the dependencies:

<dependencies>
    <dependency>
        <groupId>org.hibernate</groupId>
        <artifactId>hibernate-core</artifactId>
        <version>${hibernate.core.version}</version>
        <exclusions>
            <exclusion>
                <groupId>org.slf4j</groupId>
                <artifactId>slf4j-api</artifactId>
            </exclusion>
            <exclusion>
                <groupId>org.slf4j</groupId>
                <artifactId>slf4j-log4j12</artifactId>
            </exclusion>
        </exclusions>
        <scope>provided</scope>
    </dependency>
    <dependency>
        <groupId>org.hibernate</groupId>
        <artifactId>hibernate-annotations</artifactId>
        <version>${hibernate.annotations.version}</version>
    </dependency>
    <dependency>
        <groupId>org.hibernate</groupId>
        <artifactId>hibernate-validator</artifactId>
        <version>${hibernate.validator.version}</version>
    </dependency>
    <dependency>
        <groupId>org.hibernate</groupId>
        <artifactId>hibernate</artifactId>
        <version>3.2.7.ga</version>
    </dependency>
    <dependency>
        <groupId>org.hibernate</groupId>
        <artifactId>hibernate-entitymanager</artifactId>
        <version>3.3.2.GA</version>
    </dependency>
    ...
</dependencies>

There may be more dependencies that need to added in addition to these, so add them in the same way.

2) Make sure that the project structure looks as follows (in NetBeans, you can simply create a new blank Maven project):

Hibernate Project setup via Maven

Place the hibernate.cfg.xml (Hibernate configuration) file into the src/main/resources folder so that it is placed on the classpath where it can be read in.

3) Add the following into the Hibernate configuration file:

<?xml version="1.0" encoding="UTF-8"?>
<!DOCTYPE hibernate-configuration PUBLIC "-//Hibernate/Hibernate Configuration DTD 3.0//EN" "http://www.hibernate.org/dtd/hibernate-configuration-3.0.dtd">
<hibernate-configuration>
    <session-factory>
        <mapping class="some.class.to.be.read.in.by.Hibernate1"/>
        ...
        <mapping class="some.class.to.be.read.in.by.Hibernate2"/>
    </session-factory>
</hibernate-configuration>

4) Add a new configuration properties file into the same directory src/main/resources and call it <project_name>.properties:

The usual Hibernate configuration parameters such as the dialect, to show SQL, the hbm2ddl settings can be added in here too or separated to another properties file. I have separated it into another file for convinience and placed it in the same directory as the Hibernate configuration file. The contents of this file are:

#Production configuration of phonebookapp
# set phonebookapp.properties in /src/main/resources for property explanation
hibernate.dialect=org.hibernate.dialect.PostgreSQLDialect
hibernate.show_sql=true
hibernate.format_sql=true
hibernate.hbm2ddl.auto=auto

datasource.url=jdbc:postgresql://localhost:5432/postgres
datasource.class=org.postgresql.Driver
datasource.username=user
datasource.password=pass

The Hibernate settings will  be picked up by the SessionFactory from a Spring configuration file and all properties will be injected in. This allows one Hibernate settings file holding common properties but separates the properties that are different for each environment.

5) Configure Spring to read in these properties files to setup the Hibernate SessionFactory

For Hibernate to work, the session factory it uses needs to be setup via Spring. To do this, add the following into the Spring application context XML file:

    <bean id="configProperties"
        class="org.springframework.beans.factory.config.PropertiesFactoryBean">
        <property name="location" value="classpath:phonebookapp.properties" />
    </bean>

    <!--
        Declare the Hibernate SessionFactory for retrieving Hibernate sessions
    -->
    <bean id="sessionFactory"
        class="org.springframework.orm.hibernate3.annotation.AnnotationSessionFactoryBean"
                 p:dataSource-ref="dataSource" >
        <property name="hibernateProperties" ref="configProperties" />
        <property name="schemaUpdate" value="true" />
        <property name="packagesToScan" value="com.riz.phonebookapp.domain.**.*"/>
        <property name="configLocation" value="classpath:hibernate.cfg.xml"/>
    </bean>

Notice how the properties file is referenced? It uses a reference, configProperties, to read in the properties file to create the Hibernate session factory.

The Hibernate project is now ready.

I’ve been playing with some Hibernate and JPA annotations to familiarise myself with the way they’re used and which scenarios they can applied. This is a learning process for me.

When using Hibernate/JPA with annotations (without the hbm.xml files), typically the following annotations are encountered (in my limited experience):

@Entity

A class annotated as an entity means that the class becomes a JPA/Hibernate entity, meaning they will be persisted in the database and can also be validated.

@Table(name="SomeTableName")

By default, Hibernate will set the table name as same as the entity class name. This can be overridden with a class level annotation of Table that sets the database table for the class.

@NamedQueries ( { @NamedQuery(name="QueryName", query="HQL Query here"),
                  @NamedQuery(name="QueryName", query="HQL Query here")
})

An entity class can have many named queries where HQL (Hibernate Query Lanuage) can be used to manipulate the particular table(s) stored in the database. Each named query must have a unique name and can be accessible anywhere in an application to be called.

@Id

Id is a special annotation that uses fields in a class to highlight them to be treated as IDs.

@GeneratedValue

This annotation is usually paired along with the @Id annotation and means that the unique identifiers are auto generated by Hibernate.

@Column(name="columnName", nullable=false, length=99)

Each field in an entity can correspond to a column, where a column name, length and whether the column can be null can be specified.

@ManyToMany(cascade=cascadeType.PERSIST)

This annotation means that the association will be many to many between two entities and that an intermediate table needs to be setup between the two entities to handle the relationship. This intermediate links the two entities together and has relationship of many-to-one and one-to-many respectively. The cascade type of PERSIST means that do not persist the entire object map each time a save is done, only on the change entity itself. A cascade type of ALL would do the entire object tree persistence.

@JoinTable(name="newJoinedTableName",
           joinColumns={@JoinColumn(name="existingTableColumnPrimaryKey") },
           inverseJoinColumn={@JoinColumn(name="existingTableColumnForeignKey") },
           uniqueConstraints={@UniqueConstraint(columnNames="columnToMakeUniqueSoOneToMany")
})

Tables that are generated can be joined to create a new table that holds joined columns and foreign key columns. A unique constraint can be added to a column to join so that one of the sides of ‘Many’ becomes ‘One’. InverseJoinColumn means the other side of the ManyToMany association.

@org.hibernate.annotations.Type(type="your.special.type.class.for.this.TableColumn")

Sometimes, a unique data type is needed to hold information about certain pieces of data, such as phone type, address type. A new data type can be created and associated with a column by using the Hibernate @Type annotation as shown above.

Where to place the annotations?

Annotations such as those listed above should be placed in the POJO Entity class’ getter methods. Sometimes, some of the validations and annotations listed above do not work correctly if the annotations are declared at field level.

I have recently been studying the Hibernate tutorials to understand Hibernate better in the projects I have been working with. Unfortunately, the tutorial as is does lead you down a blind alley in a few cases, nothing major, but can leave you tearing your hair out as it’s assumed you would know how to make the applications work!

The last section of chapter 1, where you create an EventManagerServlet, the tutorial says:

To build and deploy call mvn package in your project directory and copy the hibernate-tutorial.war file into your Tomcat webapps directory.”

That seems all well and straightforward, but when you issue the Maven command it builds a JAR file! To make it build a WAR, simply modify the Maven POM file, so that:

<packaging>jar</packaging>

is changed to:

<packaging>war</packaging>

As easy as that! Now you have a WAR file under the target folder of the project.

The next issue was that when deploying to Tomcat, the default application would not start due to a ClassCastException and/or in the startup logs, Tomcat complains that there is a conflict in the servlet API JAR. This is because the servlet-api dependency declared in the Maven POM file is bundled in with the tutorial application thus causing this conflict. To prevent the JAR from being bundled in but still referenced under NetBeans so the project still compiles, simply add the following:

<scope>provided</scope>

to:

<dependency>
 <groupId>javax.servlet</groupId>
 <artifactId>servlet-api</artifactId>
 <version>2.5</version>
</dependency>

do that it becomes:

<dependency>
 <groupId>javax.servlet</groupId>
 <artifactId>servlet-api</artifactId>
 <version>2.5</version>
 <scope>provided</scope>
</dependency>

This tells Maven that use this dependecy but when building, do not bundle the JARs in with the application.

Once rebuilt, deploy to Tomcat and run in the usual manner. All should work as is!

This post shows a simple example of how to call EJBs deployed on one server (in this case JBoss AS) from a different server (Glassfish AS). This example is useful because in some cases, EJBs are called from different remote servers in truly distributed applications.

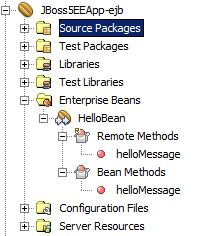
Firstly create an enterprise project called JBoss5EEApp. Also create an EJB module called JBoss5EEApp-ejb. Create a stateless session bean called HelloBean, has a single business method called sayHello that takes in a string parameter and returns a string message.

Once the EJB has been created, it should like as follows under NetBeans

Simple EJB project

Simple EJB project

Deploy it onto the JBoss AS by right clicking the EAR project and clicking Run, this will deploy and start the application on the server.

Now that the EJBs are ready and running, it is time to create the client to be run on the Glassfish server. Firstly, create a new web application under NetBeans and set the target server to point to the Glassfish server. Call the project GlassfishWebApp.

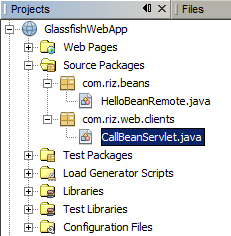
The EJB module contains source for the EJB and it’s remote interface, in this case called HelloBeanRemote. Copy the package and this remote interface into the web project for Glassfish. Now create a new servlet called CallBeanServlet, place it in a package com.riz.web.clients. The package structure should now look as follows.

Glassfish web project

Glassfish web project

The code for the processRequest method within the servlet should be as follows:

    private HelloBeanRemote hello;

    /**
     * Processes requests for both HTTP <code>GET</code> and <code>POST</code> methods.
     * @param request servlet request
     * @param response servlet response
     * @throws ServletException if a servlet-specific error occurs
     * @throws IOException if an I/O error occurs
     */
    protected void processRequest(HttpServletRequest request, HttpServletResponse response)
    throws ServletException, IOException {
        response.setContentType("text/html;charset=UTF-8");
        PrintWriter out = response.getWriter();
        try {
            Hashtable<String, String> ctxParams = new Hashtable<String, String>();
            ctxParams.put(Context.INITIAL_CONTEXT_FACTORY, "org.jnp.interfaces.NamingContextFactory");
            ctxParams.put(Context.URL_PKG_PREFIXES, "org.jboss.naming:org.jnp.interfaces");
            ctxParams.put(Context.PROVIDER_URL, "localhost:1099");
            InitialContext context = new InitialContext(ctxParams);
            hello = (HelloBeanRemote) context.lookup("HelloBean");
            String message = hello.helloMessage("riz, called this from GlassFish AS 3.0.1 Open Source Edition");
            // TODO output your page here
            out.println("<html>");
            out.println("<head>");
            out.println("<title>Servlet CallBeanServlet</title>"); 
            out.println("</head>");
            out.println("<body>");
            out.println("<h1>Called JBoss AS 5.1, returning this message: " + message + "</h1>");
            out.println("</body>");
            out.println("</html>");
        } catch (Exception e) {
            e.printStackTrace();
            e.getCause();
        } finally {
            out.close();
        }
    }

Notice that the lookup points to the JBoss server settings. One important thing to do is to set the classpath to include the JBoss AS client JARs and the EJB module project JAR. Add these JARs to the project and tick each of them to be packaged in the WAR that will be generated except for the EJB module project JAR. Leave only that one unticked.

C:\jboss-5.1.0.GA\client\commons-logging.jar;
C:\jboss-5.1.0.GA\client\concurrent.jar;
C:\jboss-5.1.0.GA\client\ejb3-persistence.jar;
C:\jboss-5.1.0.GA\client\hibernate-annotations.jar;
C:\jboss-5.1.0.GA\common\lib\hibernate-core.jar;
C:\jboss-5.1.0.GA\client\jboss-aop-client.jar;
C:\jboss-5.1.0.GA\client\jboss-appclient.jar;
C:\jboss-5.1.0.GA\client\jboss-aspect-jdk50-client.jar;
C:\jboss-5.1.0.GA\client\jboss-client.jar;
C:\jboss-5.1.0.GA\client\jboss-common-core.jar;
C:\jboss-5.1.0.GA\client\jboss-deployers-client-spi.jar;
C:\jboss-5.1.0.GA\client\jboss-deployers-client.jar;
C:\jboss-5.1.0.GA\client\jboss-deployers-core-spi.jar;
C:\jboss-5.1.0.GA\client\jboss-deployers-core.jar;
C:\jboss-5.1.0.GA\client\jboss-deployment.jar;
C:\jboss-5.1.0.GA\client\jboss-ejb3-common-client.jar;
C:\jboss-5.1.0.GA\client\jboss-ejb3-core-client.jar;
C:\jboss-5.1.0.GA\client\jboss-ejb3-ext-api.jar;
C:\jboss-5.1.0.GA\common\lib\jboss-ejb3-interceptors.jar;
C:\jboss-5.1.0.GA\common\lib\jboss-ejb3-metadata.jar;
C:\jboss-5.1.0.GA\client\jboss-ejb3-proxy-clustered-client.jar;
C:\jboss-5.1.0.GA\client\jboss-ejb3-proxy-impl-client.jar;
C:\jboss-5.1.0.GA\client\jboss-ejb3-proxy-spi-client.jar;
C:\jboss-5.1.0.GA\client\jboss-ejb3-security-client.jar;
C:\jboss-5.1.0.GA\client\jboss-ha-client.jar;
C:\jboss-5.1.0.GA\client\jboss-ha-legacy-client.jar;
C:\jboss-5.1.0.GA\client\jboss-iiop-client.jar;
C:\jboss-5.1.0.GA\client\jboss-integration.jar;
C:\jboss-5.1.0.GA\client\jboss-j2se.jar;
C:\jboss-5.1.0.GA\client\jboss-javaee.jar;
C:\jboss-5.1.0.GA\common\lib\jboss-jpa-deployers.jar;
C:\jboss-5.1.0.GA\client\jboss-jsr77-client.jar;
C:\jboss-5.1.0.GA\client\jboss-logging-jdk.jar;
C:\jboss-5.1.0.GA\client\jboss-logging-log4j.jar;
C:\jboss-5.1.0.GA\client\jboss-logging-spi.jar;
C:\jboss-5.1.0.GA\client\jboss-main-client.jar;
C:\jboss-5.1.0.GA\client\jboss-mdr.jar;
C:\jboss-5.1.0.GA\client\jboss-messaging-client.jar;
C:\jboss-5.1.0.GA\client\jboss-metadata.jar;
C:\jboss-5.1.0.GA\client\jboss-remoting.jar;
C:\jboss-5.1.0.GA\client\jboss-security-spi.jar;
C:\jboss-5.1.0.GA\client\jboss-serialization.jar;
C:\jboss-5.1.0.GA\client\jboss-srp-client.jar;
C:\jboss-5.1.0.GA\client\jboss-system-client.jar;
C:\jboss-5.1.0.GA\client\jboss-system-jmx-client.jar;
C:\jboss-5.1.0.GA\lib\jboss-xml-binding.jar;
C:\jboss-5.1.0.GA\client\jbossall-client.jar;
C:\jboss-5.1.0.GA\client\jbosscx-client.jar;
C:\jboss-5.1.0.GA\client\jbossjts-integration.jar;
C:\jboss-5.1.0.GA\client\jbossjts.jar;
C:\jboss-5.1.0.GA\client\jbosssx-as-client.jar;
C:\jboss-5.1.0.GA\client\jbosssx-client.jar;
C:\jboss-5.1.0.GA\client\jmx-client.jar;
C:\jboss-5.1.0.GA\client\jmx-invoker-adaptor-client.jar;
C:\jboss-5.1.0.GA\client\jnp-client.jar;
C:\jboss-5.1.0.GA\client\slf4j-api.jar;
C:\jboss-5.1.0.GA\client\slf4j-jboss-logging.jar;
C:\jboss-5.1.0.GA\client\xmlsec.jar;

Once this step has been done, deploy the project onto the server by right clicking the web project on the NetBeans IDE and selecting the Run option. This will deploy and run the application on the Glassfish server.

Point to the address http://localhost:8887/GlassfishWebApp/CallBeanServlet

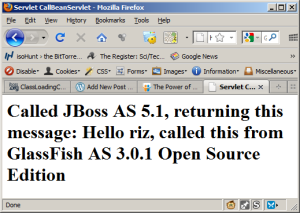
The example should run and call the HelloBean EJB from the JBoss AS side and return the result as shown.

Result from calling the JBoss AS EJB

Result from calling the JBoss AS EJB

Note that the HelloBeanRemote interface has to be included in the web project source so that the casting is done correctly when the EJB call is looked up from the Glassfish server, otherwise a ClassCastException will be thrown.

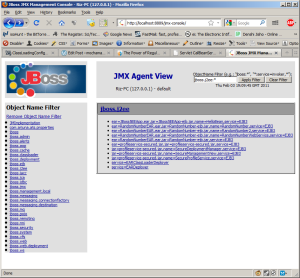
Another cast exception that can be thrown during the lookup is if the EJB has not been correctly deployed on the JBoss server. Ensure that EJBs are deployed correctly before running the Glassfish client. To ensure EJBs are correctly deployed, they can be viewed via the JMX console under JBoss. Under NetBeans, click on the Services window, expand the servers tree node, right click the JBoss AS node and select the View JMX Console option. Once the JMX console has appeared in the web browser, on the left hand side, select the jboss.j2ee link in the list of links and on the main right hand side, the EJB projects should all be listed including the HelloBean module and its associated JAR file as shown.

JBoss AS JMX console

JBoss AS JMX console

/*
* To change this template, choose Tools | Templates
* and open the template in the editor.
*/package com.riz.web.clients;

import com.riz.beans.HelloBeanRemote;
import java.io.IOException;
import java.io.PrintWriter;
import java.util.Hashtable;
import javax.naming.Context;
import javax.naming.InitialContext;
import javax.servlet.ServletException;
import javax.servlet.annotation.WebServlet;
import javax.servlet.http.HttpServlet;
import javax.servlet.http.HttpServletRequest;
import javax.servlet.http.HttpServletResponse;

/**
*
* @author Riz
*/
@WebServlet(name=”CallBeanServlet”, urlPatterns={“/CallBeanServlet”})
public class CallBeanServlet extends HttpServlet {

//@EJB(mappedName=”HelloBean”)
private HelloBeanRemote hello;

/**
* Processes requests for both HTTP <code>GET</code> and <code>POST</code> methods.
* @param request servlet request
* @param response servlet response
* @throws ServletException if a servlet-specific error occurs
* @throws IOException if an I/O error occurs
*/
protected void processRequest(HttpServletRequest request, HttpServletResponse response)
throws ServletException, IOException {
response.setContentType(“text/html;charset=UTF-8”);
PrintWriter out = response.getWriter();
try {
Hashtable<String, String> ctxParams = new Hashtable<String, String>();
ctxParams.put(Context.INITIAL_CONTEXT_FACTORY, “org.jnp.interfaces.NamingContextFactory”);
ctxParams.put(Context.URL_PKG_PREFIXES, “org.jboss.naming:org.jnp.interfaces”);
ctxParams.put(Context.PROVIDER_URL, “localhost:1099”);
InitialContext context = new InitialContext(ctxParams);
hello = (HelloBeanRemote) context.lookup(“HelloBean”);
String message = hello.helloMessage(“riz, called this from GlassFish AS 3.0.1 Open Source Edition”);
// TODO output your page here
out.println(“<html>”);
out.println(“<head>”);
out.println(“<title>Servlet CallBeanServlet</title>”);
out.println(“</head>”);
out.println(“<body>”);
out.println(“<h1>Called JBoss AS 5.1, returning this message: ” + message + “</h1>”);
out.println(“</body>”);
out.println(“</html>”);
} catch (Exception e) {
e.printStackTrace();
e.getCause();
} finally {
out.close();
}
}

// <editor-fold defaultstate=”collapsed” desc=”HttpServlet methods. Click on the + sign on the left to edit the code.”>
/**
* Handles the HTTP <code>GET</code> method.
* @param request servlet request
* @param response servlet response
* @throws ServletException if a servlet-specific error occurs
* @throws IOException if an I/O error occurs
*/
@Override
protected void doGet(HttpServletRequest request, HttpServletResponse response)
throws ServletException, IOException {
processRequest(request, response);
}

/**
* Handles the HTTP <code>POST</code> method.
* @param request servlet request
* @param response servlet response
* @throws ServletException if a servlet-specific error occurs
* @throws IOException if an I/O error occurs
*/
@Override
protected void doPost(HttpServletRequest request, HttpServletResponse response)
throws ServletException, IOException {
processRequest(request, response);
}

/**
* Returns a short description of the servlet.
* @return a String containing servlet description
*/
@Override
public String getServletInfo() {
return “Short description”;
}// </editor-fold>

}

This post shows a simple example of creating a simple stateless EJB that has two business methods. One generates a random number, between zero and one, and the other method takes a single parameter that will generate a number between zero and that number.

  • Under the NetBeans IDE, create a new Java EE Enterprise Application project, give it a name, set the location and click Next.
  • Set the server as JBoss Application Server, Java EE version 5 and create an EJB module with the name RandomNumber-ejb and click Finish.

A new project appears on the Projects list as shown below.
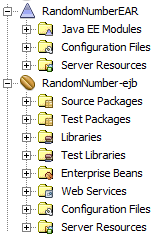
New EJB Project

New EJB Project

Right click on the RandomNumber-ejb project, and

  • Select new Session Bean
  • Give it a name of RandomNumber and a package name
  • Set it to Stateless
  • Select the Local and Remote checkboxes
  • Click Finish

A new EJB appears in the list called RandomNumber. Open this in the source editor.

Create two new methods,

  1. findNum that takes no arguments and returns a double
  2. findNumInRange that takes a double as an argument and returns a random double between 0 and that number.

To create a method and ensures it gets promoted to the Remote interface

  • Right click in the source editor
  • Select Insert Code…
  • Select Add Business Method…
  • A dialog box appears to enter the method name, parameters and return types.

Once implemented, right click on the EAR project and select Clean and Build… and then deploy it by selecting the Deploy option. JBoss will deploy the EJB and make it available as shown in the logs:

11:24:47,403 INFO  [SessionSpecContainer] Starting jboss.j2ee:ear=RandomNumberEAR.ear,jar=RandomNumber-ejb.jar,name=RandomNumber,service=EJB3
11:24:47,403 INFO  [EJBContainer] STARTED EJB: com.riz.randomnumber.beans.RandomNumber ejbName: RandomNumber
11:24:47,872 INFO  [JndiSessionRegistrarBase] Binding the following Entries in Global JNDI:

 RandomNumber - EJB3.x Default Remote Business Interface
 RandomNumberEAR/RandomNumber/remote-com.riz.randomnumber.beans.RandomNumberRemote - EJB3.x Remote Business Interface

Now that the EJB is deployed, you can create a client to test the EJB under JBoss, but we will make web services out of these via JAX-WS and then generate clients to call the web services.

To create a web service from an EJB, right click the bean under the EJB module project,

  • Select New > Web Service…
  • Name the web service and give it a package name
  • Select the option Create Web Service from Existing Session Bean
  • Browse for the EJB you created, select it and click Finish.

The web service should be created and can be viewed in the project hierarchy:
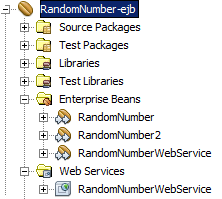
Web service view

Web service view

Deploy the EAR project onto JBoss server, the logs should show it deployed.

11:24:48,434 INFO  [SessionSpecContainer] Starting jboss.j2ee:ear=RandomNumberEAR.ear,jar=RandomNumber-ejb.jar,name=RandomNumberWebService,service=EJB3
11:24:48,434 INFO  [EJBContainer] STARTED EJB: com.riz.randomnumber.ws.RandomNumberWebService ejbName: RandomNumberWebService
11:24:48,863 INFO  [JndiSessionRegistrarBase] Binding the following Entries in Global JNDI:

11:24:48,906 INFO  [DefaultEndpointRegistry] register: jboss.ws:context=RandomNumberEAR-RandomNumber-ejb,endpoint=RandomNumberWebService
11:24:49,111 INFO  [WSDLFilePublisher] WSDL published to: file:/C:/jboss-5.1.0.GA/server/default/data/wsdl/RandomNumberEAR.ear/RandomNumber-ejb.jar/RandomNumberWebServiceService5116477380875990466.wsdl
11:24:49,184 INFO  [TomcatDeployment] deploy, ctxPath=/RandomNumberEAR-RandomNumber-ejb
11:24:49,200 WARNING [config] Unable to process deployment descriptor for context '/RandomNumberEAR-RandomNumber-ejb'
11:24:49,363 INFO  [config] Initializing Mojarra (1.2_12-b01-FCS) for context '/RandomNumberEAR-RandomNumber-ejb'
11:24:49,386 INFO  [TomcatDeployment] deploy, ctxPath=/RandomNumber-war
11:24:49,459 INFO  [Http11Protocol] Starting Coyote HTTP/1.1 on http-127.0.0.1-8889
11:24:49,479 INFO  [AjpProtocol] Starting Coyote AJP/1.3 on ajp-127.0.0.1-8818

The web services that are deployed on the server can be browsed by pointing to the jbossws context root, http://localhost:8080/jbossws (your port number should be changed if different to default 8080).
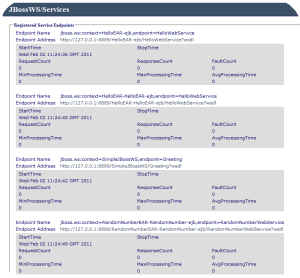
JBoss deployed web services view

JBoss deployed web services

Notice that the WSDLs can be browsed for each web service that is deployed. The RandomNumber web service has now been deployed and is present on the list of services. A web service client now needs to be implemented to make use of this deployed service.

  1. Make a note of the URL of the WSDL of the RandomNumber web service.
  2. Create a new Web Project (if the client is web based) or Java Application (is standard J2SE application)
  3. Start DOS (under Windows) or shell (under Linux)
  4. Navigate to the project source folder cd <project location>\src\java
  5. Now JBoss needs to generate client-side code based on the WSDL deployed so that clients can invoke the web services. This is done via the JBoss wsconsume tool.
  6. Invoke the wsconsume tool by issuing this command (for web project, Windows)
c:\jboss-5.1.0.GA\bin\wsconsume.bat -k -s . -o ..\..\build\web\WEB-INF\classes -t 2.1 http://127.0.0.1:8889/RandomNumberEAR-RandomNumber-ejb/RandomNumberWebService?wsdl

Output is shown when this command is executed:

generating code...

com\riz\randomnumber\ws\FindNum.java
com\riz\randomnumber\ws\FindNumInRange.java
com\riz\randomnumber\ws\FindNumInRangeResponse.java
com\riz\randomnumber\ws\FindNumResponse.java
com\riz\randomnumber\ws\ObjectFactory.java
com\riz\randomnumber\ws\RandomNumberWebService.java
com\riz\randomnumber\ws\RandomNumberWebServiceService.java
com\riz\randomnumber\ws\package-info.java

compiling code...
<other output>

Go back to the NetBeans editor and the source packages should now have an additional package that contains the generated web service client code.
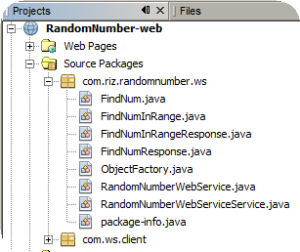
NetBeans source package view

NetBeans source package view

Create a new servlet and enter this snippet of code to call the web service that has been deployed on JBoss:

protected void processRequest(HttpServletRequest request, HttpServletResponse response)
 throws ServletException, IOException {
 response.setContentType("text/html;charset=UTF-8");
 PrintWriter out = response.getWriter();
 try {
 RandomNumberWebServiceService service = new RandomNumberWebServiceService();
 RandomNumberWebService port = service.getRandomNumberWebServicePort();
 double maxNumber = 5.0;
 out.println("<html>");
 out.println("<head>");
 out.println("<title>Servlet RandomNumberServlet</title>"); 
 out.println("</head>");
 out.println("<body>");
 out.println("<h1>");
 out.println("no arg call: " + port.findNum());
 out.println("one arg call: " + port.findNumInRange(maxNumber));
 out.println("</h1>");
 out.println("</body>");
 out.println("</html>");
 } finally {
 out.close();
 }
 }

The code snippets in red are the web service calls.

Deploy this application on JBoss and run  the servlet, the following should be displayed in a web browser:
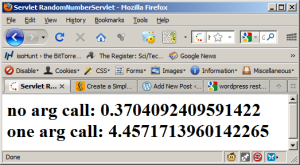
Servlet output

That’s all there is to it to create simple web or J2SE clients to call deployed web services on JBoss.